Transform Your Walls: Creative Cat Shelf Ideas for Every Style
Cats are natural-born explorers and climbers, with an innate desire to survey their surroundings from a lofty perch. It’s a primal instinct that makes them feel safe, secure, and in control of their domain. If you've ever watched your feline friend effortlessly leap onto the highest bookshelf or window ledge, you know the appeal of vertical space. This is precisely why building custom cat shelves can be one of the most rewarding DIY projects for both you and your beloved pet. Far from being mere decorations, these elevated havens provide essential enrichment, exercise, and a sense of belonging, all while reclaiming valuable floor space often occupied by bulky cat trees. If you’re wondering
how to build cat shelves that your cat will love, you’re in the right place. We’ll explore creative ideas, essential safety tips, and practical steps to craft the purr-fect vertical playground for your furry companion.
Why Your Feline Friend Needs Wall-Mounted Adventures
Cats thrive on elevated vantage points. From up high, they can observe household activities without feeling overwhelmed, spot potential "prey" (like a dust bunny or your foot!), and enjoy a quiet retreat away from other pets or small children. Providing these elevated spaces is crucial for their physical and mental well-being. Wall-mounted cat shelves offer several distinct advantages:
* **Instinctual Fulfillment:** Satisfy their natural urges to climb, jump, and perch.
* **Enhanced Security:** A higher position offers a better escape route and a sense of safety from perceived threats.
* **Physical Exercise:** Encourages active movement, preventing obesity and promoting agility.
* **Mental Stimulation:** Keeps boredom at bay, offering new perspectives and challenges.
* **Space Saving:** Liberate your floor from chunky cat furniture, making your home feel more open and organized.
* **Territorial Confidence:** Helps multi-cat households by offering individual high-up zones, reducing potential conflicts.
Ultimately, by creating these personalized aerial pathways, you��re not just building furniture; you're cultivating an environment that truly caters to your cat's deepest desires, making them feel happier, healthier, and more loved.
Essential Considerations Before You Build
Before you grab your tools and start planning your feline masterpiece, a few crucial considerations will ensure the safety, longevity, and ultimate appeal of your cat shelves. Investing time in planning now will save you headaches later.
* **Safety First: Anchoring is Key!** This cannot be stressed enough. Your cat's safety depends entirely on how securely your shelves are mounted. Always use sturdy wall anchors designed to hold significant weight – at least 50 pounds per shelf is a good rule of thumb, but more is always better, especially if you have larger cats or multiple felines who might use a shelf simultaneously. The best practice is to locate wall studs and screw directly into them. If studs aren't available, high-quality toggle anchors or heavy-duty drywall anchors are your next best bet. A stud finder is an indispensable tool for this step.
* **Material Selection:**
* **Wood:** Plywood, pine, or oak are common choices. Opt for at least 1/2-inch to 3/4-inch thick boards for stability. Untreated wood allows for staining or painting to match your decor.
* **Traction & Comfort:** Cats need grip! Cover shelves with carpet squares, indoor/outdoor recycled carpeting, or even durable fabric. This prevents slips and adds a cozy texture. Carpet squares can be found affordably (often $4-$10) at carpet stores and attached with spray adhesive or small tacks.
* **Scratching Surfaces:** Incorporate sisal rope for vertical scratching posts or sisal mats on shelf surfaces to offer an appealing scratching outlet, diverting attention from your furniture.
* **Tools:** Beyond a stud finder, you'll need a drill, screwdriver, level, measuring tape, and possibly a saw for custom cuts.
* **Placement & Layout:**
* **Flow:** Plan a coherent path that allows your cat to ascend, descend, and navigate easily. Avoid dead ends.
* **Vantage Points:** Place shelves near windows for bird-watching opportunities or in high-traffic areas where your cat likes to observe.
* **Spacing:** Ensure safe jumping distances between shelves. Too far, and it's a dangerous leap; too close, and it’s not challenging enough. Consider your cat's agility and size.
* **Aesthetics:** Your cat shelves should blend seamlessly with your home decor. Painting shelves, drawing murals, or choosing fabric colors that complement your existing palette can turn a functional cat feature into an artistic statement.
For more detailed guidance on getting started with basic designs, check out our article:
Build Easy DIY Cat Shelves: A Beginner's Guide for Happy Felines.
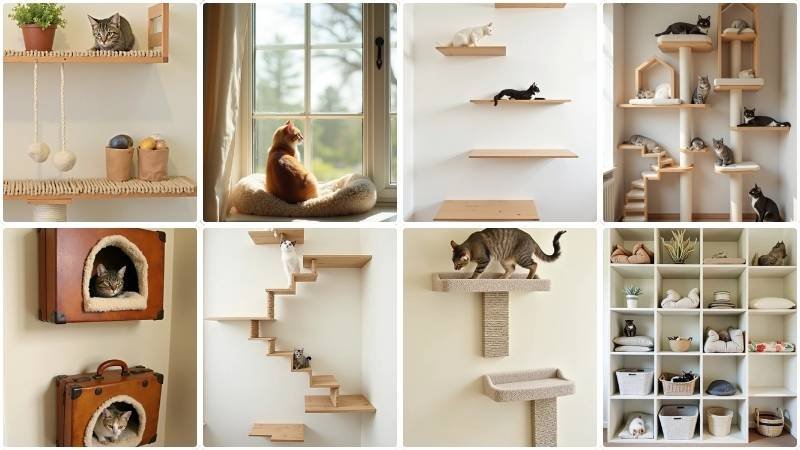
Creative Cat Shelf Designs to Inspire Your DIY Project
Now that you're armed with the basics, let's explore some inspiring designs that cater to various styles, budgets, and DIY skill levels.
1. The Simplistic & Budget-Friendly Perch
For beginners or those on a tight budget, a few basic shelves can make a big impact.
* **Concept:** Utilize pre-cut shelves (e.g., 18-inch and 24-inch widths work well) with sturdy mounting hardware.
* **Materials:** Pre-cut wooden shelves, heavy-duty wall anchors (rated 50+ lbs), screwdriver, level, carpet squares, spray adhesive.
* **How-to:** Secure shelves to the wall using appropriate anchors. Cover the surfaces with carpet squares, cut to size, using spray adhesive for excellent traction and a splash of color. This approach is quick, affordable, and highly effective for providing immediate vertical space.
2. The Dedicated Feline Corner with an Artistic Flair
Transform an underutilized corner into your cat's personal sanctuary with a customized mural.
* **Concept:** Create a multi-level corner setup, integrated into a painted wall mural.
* **Materials:** 1/2-inch thick wooden boards (e.g., 12 inches deep by 18 inches wide), sturdy "L" brackets (side lengths at least half the board's depth), heavy-duty wall anchors, wood screws, spray adhesive, fabric for covering, paint for mural.
* **How-to:** Cut and sand your wooden boards. Attach "L" brackets to the boards using wood screws, then secure the brackets to wall studs with heavy-duty anchors. Cover the boards with a fabric of your choice using spray adhesive. Crucially, paint a vibrant mural around the installed shelves to create a cohesive, immersive environment for your cat, making it truly feel like their own special zone. Remember to space multiple boards for safe and easy cat travel.
3. The Ultimate Climbing Wall Adventure with Sisal & IKEA Hacks
For the truly adventurous cat, a climbing wall with integrated sisal elements offers maximum engagement.
* **Concept:** A multi-textured climbing wall featuring sisal rope steps and sturdy wooden platforms.
* **Materials:** IKEA Ekby Valter shelf carriers (untreated wood), solid oak panels (20cm and 30cm widths), MDF plates, white primer, Flexa paint (or similar to match your interior), 8mm thick sisal rope, spruce wood (7x4cm for steps, 9.5x9.5cm for back step, 9.5x6cm for front step), screws, nails.
* **How-to:** Prepare your wooden panels and MDF plates by priming and painting them to match your home. Cut spruce wood for sisal steps. Wrap sisal rope tightly around the spruce steps, securing the ends with a nail to prevent unwinding. Mount the painted panels as shelves using the IKEA carriers. Integrate the sisal steps strategically along the climbing path, fixing them securely to the wall. This design offers a dynamic challenge and excellent scratching opportunities.
4. Integrated Scratching Posts & Rustic Charm
Combine climbing platforms with an essential scratching post for a multi-functional piece that looks great.
* **Concept:** Rustic-looking shelves made from pine boards, connected by a robust sisal-wrapped scratching post.
* **Materials:** Two 1" x 12" x 8' pine boards (knots add character!), one 6" x 6" x 8' post, 100 feet of 3/8" natural sisal rope, indoor/outdoor recycled carpet, 24 black steel L-corner brace brackets.
* **How-to:** Sand, measure, and cut your pine boards into shelves of various lengths. Stain the wood for a rustic aesthetic. Cut a hole in one shelf if you desire an alternative access point. Attach the shelves to the wall using the L-corner brace brackets, ensuring optimal spacing for cat mobility. Wrap the 6x6 post tightly with sisal rope, leaving some wood exposed for visual contrast, and secure it vertically between shelves or as a standalone scratching pillar. This design is highly functional, providing both climbing and scratching options.
5. No-Woodworking Wonders: Repurposing IKEA Lack Shelves
If woodworking isn't your forte, existing furniture can be your shortcut to cat shelves.
* **Concept:** Utilize pre-made IKEA Lack shelves, easily adaptable for feline use.
* **Materials:** IKEA Lack shelves, carpeting, spray adhesive or strong double-sided tape.
* **How-to:** Simply cover the surfaces of the IKEA Lack shelves with carpet or a durable fabric using spray adhesive. Ensure the carpeting is securely attached for traction. Mount the shelves as per IKEA's instructions, making sure to hit studs or use heavy-duty anchors. This method offers a super budget-friendly and zero-woodworking solution for instant cat-friendly perches.
To explore more easy and budget-friendly options that maximize space, dive into:
DIY Cat Shelves: Maximize Playtime & Space & Even on a Budget.
Making Your Cat Shelves Irresistible: Tips for Feline Appeal
Building the shelves is half the battle; ensuring your cat actually uses and loves them is the other. Here are tips to make your new feline infrastructure a hit:
* **Enticing Textures:** Always include soft, grippy surfaces like carpet, sisal, or fabric. Cats adore scratching posts and comfortable napping spots.
* **Varying Heights and Pathways:** Design an interesting route with different heights and maybe even a "secret tunnel" or two (if using multiple walls or an enclosed space). Offer multiple access points and exit strategies.
* **Strategic Placement:** Position shelves near windows so your cat can indulge in bird-watching, or in areas where they can survey the room. A shelf above a doorway can be a prime lookout spot.
* **Adding Incentives:** Initially, entice your cat onto the shelves with treats, toys, or catnip. Place their favorite blanket or a small bed on a top shelf to encourage lounging.
* **Gradual Introduction:** Some cats are cautious. Introduce them slowly to the new structures. Don't force them; let them explore at their own pace.
By combining sturdy construction with thoughtful design that considers your cat’s natural instincts, you'll be well on your way to creating an enriching and beloved vertical playground.
Conclusion
Building cat shelves is more than just a home improvement project; it's an investment in your cat's happiness and well-being. By understanding
how to build cat shelves that your cat will love, you're providing them with the essential vertical territory they crave, fostering their natural instincts, and giving them a safe, stimulating environment to thrive in. From simple budget-friendly perches to elaborate climbing walls with integrated scratching posts, the possibilities are endless. Choose a design that suits your space, your skill level, and most importantly, your beloved feline's personality. With careful planning, secure installation, and a touch of creativity, you'll transform your walls into an adventure park your cat will adore for years to come. Get ready to watch your furry friend climb, leap, and lounge with joy!